• Home
  • Services
    • Basement Finishing
    • Garage Finishing
    • Popcorn Ceiling Removal
    • Drywall Repair
    • Remodel
  • Contact
  • Area Served
    • Brooklyn Park
    • Minneapolis
    • New Hope
    • Plymouth
  • Blog

​Expert Insights on Drywall Installation: A Guide for Contractors and Homeowners

Mudding Over Paint

2/10/2023

0 Comments

 
As a professional drywall company, Maple Grove Drywall Pros has years of experience in all aspects of drywall installation and repair. One of the tasks we often encounter is covering painted drywall with mud. Whether it's for repair work or to create a smooth surface for texturing, applying mud to painted drywall can be a bit more complicated than applying it to raw drywall.
Here's the proper way to cover painted drywall with mud:
  1. Clean the surface: Before applying mud to painted drywall, it's important to make sure the surface is clean and free of any dirt, dust, or debris. A damp cloth can be used to wipe down the surface, or a vacuum can be used to remove any loose particles.
  2. Sand the surface: Sanding the surface of the painted drywall will help to rough up the surface, allowing the mud to better adhere to the paint. Use a fine-grit sandpaper and sand in a circular motion, making sure to remove any high spots or rough areas.
  3. Apply a bonding agent: Because paint can create a barrier between the mud and the drywall, it's important to use a bonding agent to help the mud stick to the surface. Simply apply a thin, even layer of bonding agent to the surface and allow it to dry completely before moving on to the next step.
  4. Apply the mud: Once the bonding agent is dry, it's time to apply the mud. Start by applying a thin, even layer of mud to the surface, using a taping knife or drywall trowel. Be sure to cover the entire surface, including the seams and corners, and work the mud into the surface to ensure a good bond.
  5. Sand the mud: After the mud has dried, use a sanding block to sand it down to a smooth surface. Sand in a circular motion, making sure to remove any high spots or rough areas. Be careful not to sand too aggressively, as this can cause the mud to crack.
  6. Repeat steps 4 and 5: Depending on the thickness of the mud, it may be necessary to repeat steps 4 and 5 several times to build up a thick enough layer to cover the surface. Make sure to allow each layer to dry completely before applying the next.
By following these steps, you can ensure a proper application of mud to painted drywall. Keep in mind that applying mud to painted drywall requires patience and attention to detail, but with the right approach, you can achieve a smooth, even surface that is ready for texturing or painting.
At Maple Grove Drywall Pros, we take pride in our work and strive to deliver the best possible results to our clients. If you're in need of drywall repair or installation services, give us a call. Our team of experts is ready to help!
0 Comments

Paper Or Mesh Tape?

1/31/2023

0 Comments

 
Picture
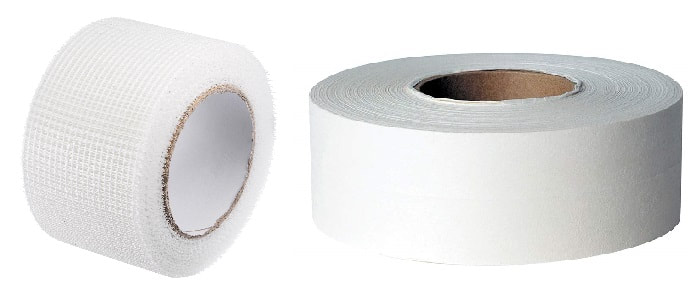
Drywall tape is an essential component in finishing drywall as it helps to conceal seams and joints between sheets of drywall. There are two main types of drywall tape available: mesh drywall tape and paper drywall tape. In this blog post, we will explore the pros and cons, differences, and best practices of using both mesh drywall tape and paper drywall tape, as well as provide instructions on how to utilize each.
Pros and Cons of Mesh Drywall Tape
Mesh drywall tape has several benefits and drawbacks. The benefits of using mesh drywall tape include:
Pros:
  1. Easy to Apply: Mesh drywall tape is easy to apply, making it a popular choice among professionals and DIY enthusiasts. Simply apply a layer of joint compound to the seams and then place the tape over the top, smoothing it out with a trowel.
  2. Strong: Mesh drywall tape is strong and durable, providing a reliable and long-lasting solution for covering seams and joints.
  3. Fast Drying: Mesh drywall tape dries quickly, allowing you to complete your project in a timely manner.
  4. Resistant to Cracking: Mesh drywall tape is resistant to cracking, making it an ideal solution for high-traffic areas.
However, there are also several drawbacks to using mesh drywall tape, including:
Cons:
  1. Visible: Mesh drywall tape is visible through paint and can detract from the overall appearance of your walls.
  2. Prone to Bubbles: Mesh drywall tape is prone to forming air bubbles, which can detract from the appearance of your walls.
  3. Requires Skilled Application: Mesh drywall tape requires skilled application to ensure that it is applied correctly and that bubbles do not form.
Pros and Cons of Paper Drywall Tape
Paper drywall tape also has several benefits and drawbacks. The benefits of using paper drywall tape include:
Pros:
  1. Conceals Seams: Paper drywall tape is designed to conceal seams and joints, resulting in a smooth and seamless finish.
  2. Easy to Apply: Paper drywall tape is easy to apply, making it a popular choice among professionals and DIY enthusiasts. Simply apply a layer of joint compound to the seams and then place the tape over the top, smoothing it out with a trowel.
  3. Strong: Paper drywall tape is strong and durable, providing a reliable and long-lasting solution for covering seams and joints.
  4. Resistant to Cracking: Paper drywall tape is resistant to cracking, making it an ideal solution for high-traffic areas.
Cons:
  1. Slow Drying: Paper drywall tape dries slowly, which can slow down the pace of your project.
  2. Prone to Shrinking: Paper drywall tape is prone to shrinking, which can detract from the appearance of your walls.
  3. Requires Skilled Application: Paper drywall tape requires skilled application to ensure that it is applied correctly and that it does not shrink or wrinkle.
Differences between Mesh Drywall Tape and Paper Drywall Tape
While both mesh drywall tape and paper drywall tape are used to cover seams and joints in drywall, there are several differences between the two. Some of these differences include:
  1. Visibility: Mesh drywall tape is visible through paint, while paper drywall tape is designed to be concealed by paint.
  2. Drying Time: Mesh drywall tape dries quickly, while paper drywall tape dries slowly.
Using mesh drywall tape to finish drywall seams is a simple and straightforward process. Here are the steps you need to follow to use mesh drywall tape:
  1. Preparing the Surface: Before you begin, make sure that the surface you are working on is clean, dry, and free of any debris. Fill any gaps or holes in the drywall with joint compound and allow it to dry completely.
  2. Applying Joint Compound: Using a putty knife, apply a thin layer of joint compound over the seams and joints where you will be applying the mesh drywall tape. Spread the compound evenly, making sure to cover the entire surface.
  3. Cutting the Mesh Drywall Tape: Take the roll of mesh drywall tape and cut a length of tape that is slightly longer than the length of the seam or joint you are covering.
  4. Applying the Mesh Drywall Tape: Take the length of mesh drywall tape and place it over the joint compound, making sure that it is centered over the seam. Use a trowel to smooth out the tape, pressing it firmly into the joint compound.
  5. Smoothing Out the Tape: Using the flat side of the trowel, smooth out the mesh drywall tape, making sure that there are no air bubbles or wrinkles. You can also use the edge of the trowel to gently press the tape into the joint compound.
  6. Allowing the Tape to Dry: Allow the mesh drywall tape to dry completely before proceeding to the next step. This usually takes about 2-4 hours, depending on the temperature and humidity levels in your workspace.
  7. Sanding the Tape: Once the mesh drywall tape is dry, use a fine-grit sandpaper to sand the tape until it is smooth and even. Be careful not to sand too much, as you do not want to damage the tape.
  8. Applying Additional Layers of Joint Compound: After sanding, apply additional layers of joint compound over the mesh drywall tape, making sure to feather the edges. Allow each layer to dry completely before sanding and applying the next layer. Repeat this process until you have achieved a smooth, seamless finish.
  9. Painting the Wall: Once you have completed the final sanding, your wall is ready to be painted. Apply paint in even, smooth coats, making sure to follow the manufacturer's instructions for best results.
Using paper drywall tape to finish drywall seams is a common and effective method for creating a smooth and seamless finish. Here are the steps you need to follow to use paper drywall tape:
  1. Preparing the Surface: Before you begin, make sure that the surface you are working on is clean, dry, and free of any debris. Fill any gaps or holes in the drywall with joint compound and allow it to dry completely.
  2. Applying Joint Compound: Using a putty knife, apply a thin layer of joint compound over the seams and joints where you will be applying the paper drywall tape. Spread the compound evenly, making sure to cover the entire surface.
  3. Cutting the Paper Drywall Tape: Take the roll of paper drywall tape and cut a length of tape that is slightly longer than the length of the seam or joint you are covering.
  4. Dipping the Tape in Water: Dip the length of paper drywall tape in a bowl of water for about 10-15 seconds. This will make the tape easier to work with and prevent it from tearing.
  5. Applying the Paper Drywall Tape: Take the length of wet paper drywall tape and place it over the joint compound, making sure that it is centered over the seam. Use a trowel to smooth out the tape, pressing it firmly into the joint compound.
  6. Smoothing Out the Tape: Using the flat side of the trowel, smooth out the paper drywall tape, making sure that there are no air bubbles or wrinkles. You can also use the edge of the trowel to gently press the tape into the joint compound.
  7. Allowing the Tape to Dry: Allow the paper drywall tape to dry completely before proceeding to the next step. This usually takes about 2-4 hours, depending on the temperature and humidity levels in your workspace.
  8. Sanding the Tape: Once the paper drywall tape is dry, use a fine-grit sandpaper to sand the tape until it is smooth and even. Be careful not to sand too much, as you do not want to damage the tape.
  9. Applying Additional Layers of Joint Compound: After sanding, apply additional layers of joint compound over the paper drywall tape, making sure to feather the edges. Allow each layer to dry completely before sanding and applying the next layer. Repeat this process until you have achieved a smooth, seamless finish.
  10. Painting the Wall: Once you have completed the final sanding, your wall is ready to be painted. Apply paint in even, smooth coats, making sure to follow the manufacturer's instructions for best results.
By following these steps, you can effectively use paper drywall tape to finish your drywall seams and joints, resulting in a professional and seamless finish.
​
0 Comments

Air Bubbles When Muding Over Paint

1/31/2023

0 Comments

 
Picture
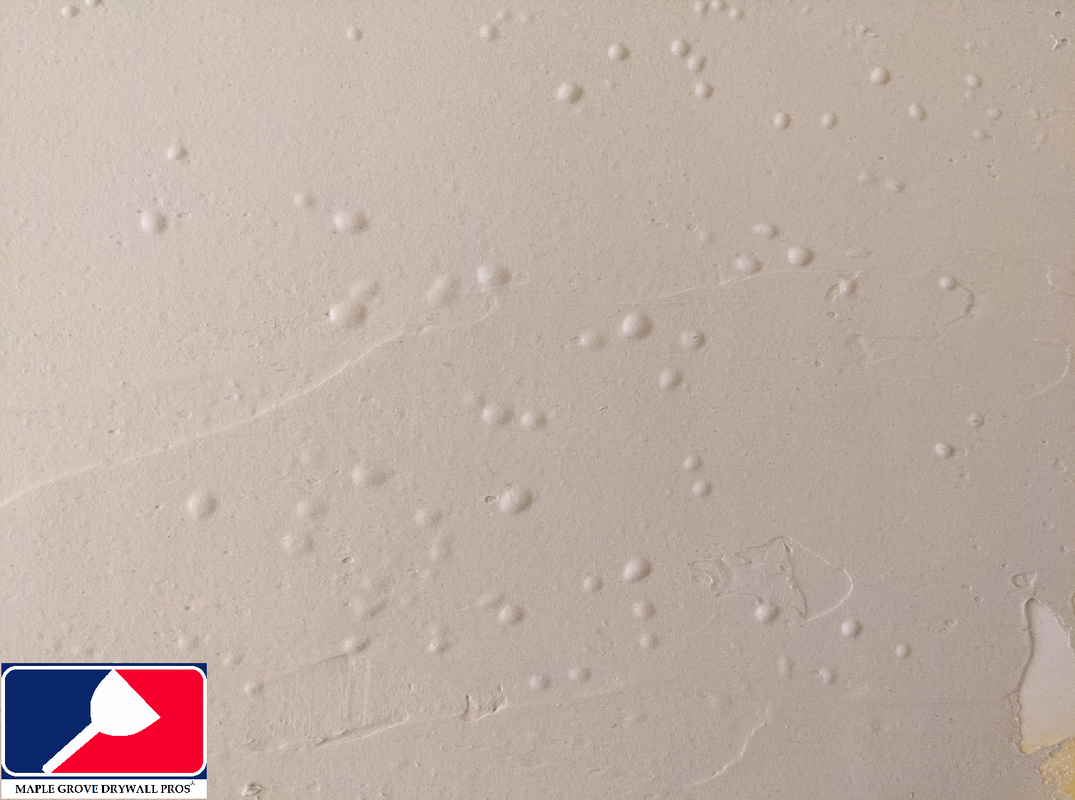
Air bubbles are a common problem faced by those who are mudding drywall. They occur when air becomes trapped under the layer of mud applied on the drywall. This can result in an uneven surface, making the wall look unsightly and difficult to paint. In this blog post, we will explain what air bubbles are when mudding drywall, how they occur when mudding over drywall that has been painted, and tips on how to prevent air bubbles in drywall mud.
What are air bubbles when mudding drywall?
Air bubbles are pockets of air that become trapped under the layer of mud applied to drywall. This can happen when the mud is not applied evenly or when it is not smoothed out properly. The result is an unsightly surface that is difficult to paint. Air bubbles are also a sign that the mud was not properly mixed or applied, which can impact the overall quality of the finish.
How do air bubbles occur when mudding over drywall that has been painted?
Air bubbles can occur when mudding over drywall that has been painted for several reasons. First, the paint may have been applied unevenly, leaving pockets of air underneath the mud. Second, the paint may not have had enough time to fully dry before the mud was applied. This can result in air pockets forming under the mud as it dries. Finally, if the mud is not applied evenly, it can cause air bubbles to form.
Tips on how to prevent air bubbles in drywall mud
  1. Proper Mixing: It is important to ensure that the mud is properly mixed before application. If the mud is not properly mixed, air pockets can form, leading to air bubbles. Use a mixer to ensure that the mud is thoroughly mixed and that there are no lumps.
  2. Smooth Application: When applying mud, it is important to ensure that it is smoothed out evenly. Avoid applying too much mud in one area or applying it too thickly. This can cause air pockets to form, leading to air bubbles.
  3. Proper Drying Time: Allow the paint to fully dry before applying the mud. If the paint is not fully dry, air bubbles can form as the mud dries.
  4. Use a Roller: A roller can help prevent air bubbles from forming by ensuring that the mud is applied evenly. Roll the mud on in a back-and-forth motion, ensuring that it is smoothed out evenly.
  5. Avoid Over-Troweling: Over-troweling the mud can cause air pockets to form. Trowel the mud lightly, ensuring that it is smoothed out evenly.
  6. Use a Compressor: A compressor can be used to remove air pockets from under the mud. Simply apply a small amount of mud to the wall and then use the compressor to remove any air pockets that have formed.
  7. Sanding: Sanding the mud after it has fully dried can help remove any air bubbles that have formed. Sand the mud lightly, ensuring that it is smoothed out evenly.
In conclusion, air bubbles are a common problem faced by those who are mudding drywall. They occur when air becomes trapped under the layer of mud applied to the drywall. To prevent air bubbles, it is important to ensure that the mud is properly mixed, applied evenly, and allowed to fully dry before sanding. By following these tips, you can prevent air bubbles from forming and ensure that your drywall is smooth and ready for painting.
0 Comments

    MGDP

    Discover the latest tips and techniques for drywall installation from industry experts. Learn about the best tools, materials, and safety measures for your next project. Get expert insights and advice for contractors and homeowners.

    Archives

    February 2023
    January 2023

    Categories

    All

    RSS Feed

Powered by Create your own unique website with customizable templates.
  • Home
  • Services
    • Basement Finishing
    • Garage Finishing
    • Popcorn Ceiling Removal
    • Drywall Repair
    • Remodel
  • Contact
  • Area Served
    • Brooklyn Park
    • Minneapolis
    • New Hope
    • Plymouth
  • Blog